GL Transactions
GL > Transactions
![]()
This is a dual level search like many of our other search screens. Be careful not to be too restrictive on your searches, as you may not find what you are looking for.
Search For: This is the information we are searching for.
By: This is what field we are searching by.
GL Account: Searching will be by the GL account.
Reference: Searching will be by the reference.
Date: Searching will be by the transaction date.
Posting Batch: Searching will be by the sub system posting batch number.
Note: Searching will be by the note.
Check #: Searching will be by the check number.
Matching - Start of Field: When the search is done, EPASS will return all records where the value typed into ‘Search For’ is at the beginning of the ‘By’ field.
End of Field: When the search is done, EPASS will return all records where the value typed into ‘Search For’ is at the end of the ‘By’ field.
Anywhere: When the search is done, EPASS will return all records where the value typed into ‘Search For’ is anywhere in the ‘By’ field.
And/Or: When using the dual level search, are we looking for matches where it must meet the first line of criteria AND the second line, or are we looking for anything that matches the first line of criteria OR the second line?
Tree View: On the left side of the search screen is a Tree View. This is similar to Windows Explorer and lets you quickly see transactions. By clicking on Source, you will see the five different transaction types, and clicking on one of them will show all transactions of that type.
All buttons except for Verify Balance, Import, Add, Exit, and Search are only activated once a transaction has been selected.
Search: When clicked, EPASS will search according to the criteria filled in. If this is left blank, all transactions will be returned.
Verify Balance: This will help find an out of balance entry.
Import: This will allow you to import transactions.
Export: This will export all transactions in the search window.
Review: This will review the selected transaction.
Add: This will add a new transaction.
Edit: This will edit the selected transaction. Be careful when editing; one journal entry comprises multiple entries and they are all dependent upon each other to balance.
Delete: This will delete the selected transaction. Be careful when deleting; one journal entry comprises multiple entries and they are all dependent upon each other to balance.
Exit: Close the screen.
ADD
This is where all the GL journal entries are entered.
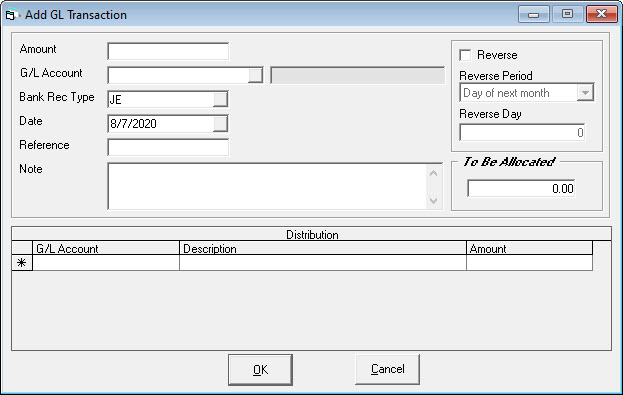
Amount: The amount of the journal entry.
G/L Account: This is the first GL account being affected by the journal entry. The distribution is entered below.
Date: The date of the transaction. Defaulted to your report date.
Reference: A short keyword or reference. The reference is mandatory.
Note: The note will be transferred to the GL.
G/L Distribution: Fill in the GL account and the amount being allocated to that account. The ‘To Be Allocated’ will be updated as amounts are filled in. The transaction cannot be saved until the ‘To Be Allocated’ is zero.
Reverse, Reverse Period, and Reverse Day: If this transaction needs to be reversed by EPASS, you can fill in these options and it will reverse it in the current month or the next month and on the specified day.
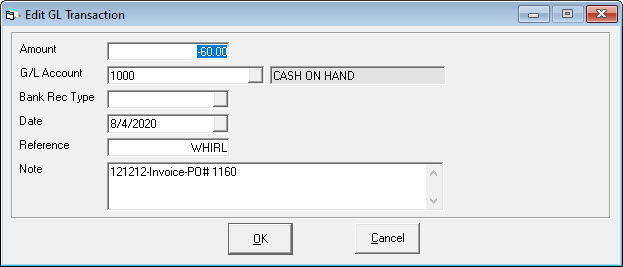
EDIT
Edit lets you modify or edit an existing transaction. Be careful when editing as a journal entry comprises multiple entries and they are all dependent upon each other to balance.
DELETE
Deleting a transaction will permanently remove the transaction. You cannot reverse a delete. Be careful when deleting as a journal entry comprises multiple entries and they are all dependent upon each other to balance.
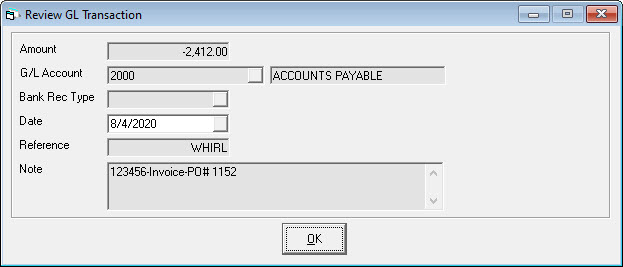
REVIEW
Review lets you look at all the details regarding a transaction, but no changes can be made. Keep in mind you are only looking at one portion of a larger journal entry.
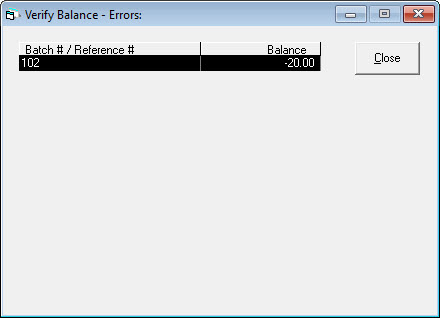
VERIFY BALANCE
Prior to GL Posting you can use this screen to see if your journal entries are in balance. The balance column will always be zero if the transactions are in balance.
This screen is not commonly used as EPASS will not make an unbalanced entry, a user must delete a partial entry before anything can go out of balance. Only once you discover an out of balance entry should you need to use this screen to help locate the problem.
IMPORT
You can import journal entries from an Excel file into the GL. Enter the line to start processing on and the columns as seen below. This is security dependent.

EXPORT
Clicking the Export button will provide you with an Excel file with all the entries you have searched for.